Last Updated on April 6, 2026 by Peperomia obtusifolia
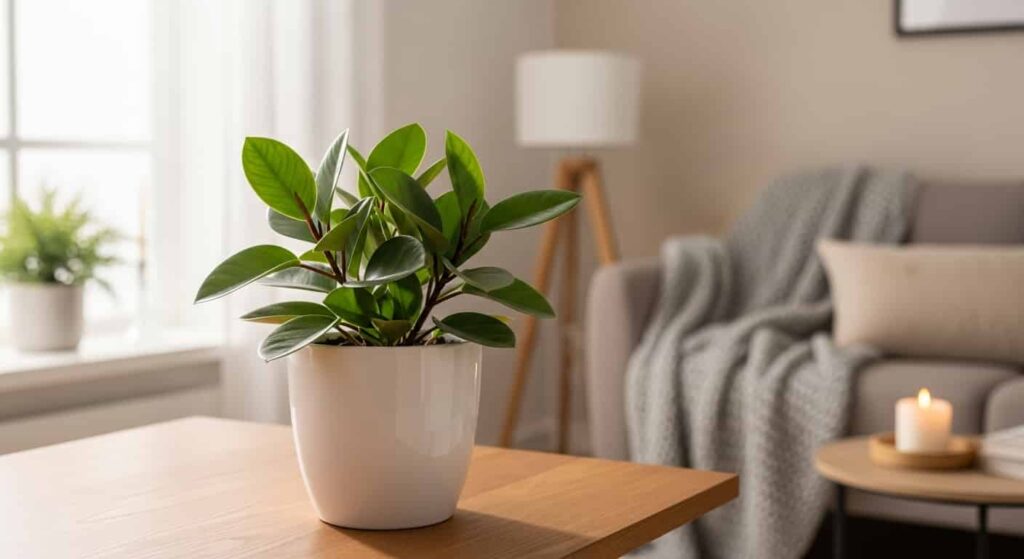
Peperomia Obtusifolia — commonly called the Baby Rubber Plant — is widely regarded as one of the easier houseplants to keep. Its thick, glossy leaves store water, it tolerates low light better than most tropicals, and it rarely demands attention. Yet brown leaves remain one of the most frequently reported problems among growers, from complete beginners to experienced plant enthusiasts.
The reason brown leaves are so confusing is that they are a symptom, not a diagnosis. A dozen entirely different problems — from too much water to too little, from scorching sun to freezing drafts, from pest infestations to fungal disease — all produce brown leaves as a final common outcome. Treating the symptom without identifying the cause almost always fails.
This guide walks you through every known cause of browning on Peperomia Obtusifolia, how to distinguish one from another, and exactly what to do to correct each one.
Quick Diagnosis: Read the Brown Before You Act
The single most useful first step is to study the browning itself — its location, texture, pattern, and spread. Each cause leaves a characteristic signature.
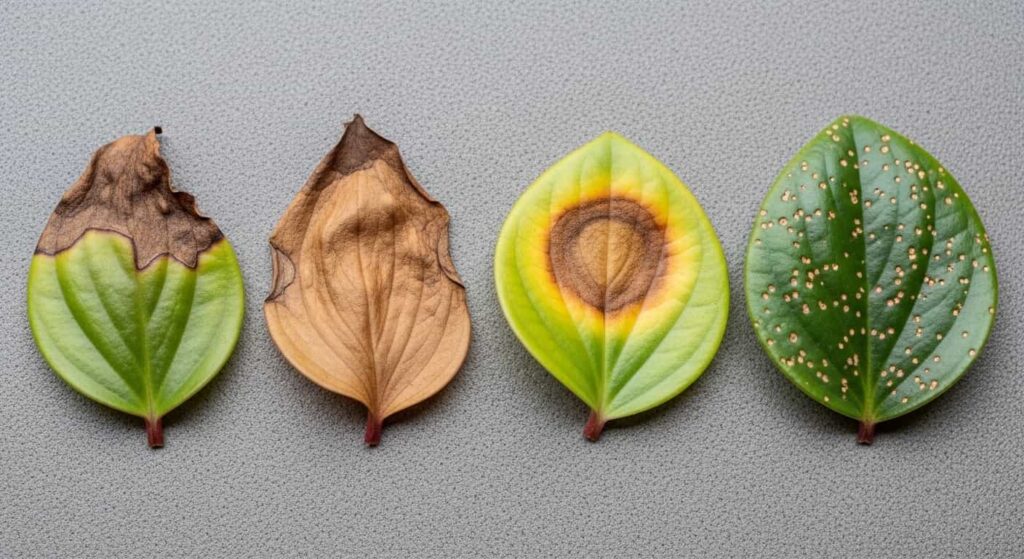
| Brown Pattern | Most Likely Cause |
|---|---|
| Soft, mushy brown patches | Overwatering or root rot |
| Crispy brown tips or edges | Low humidity, underwatering, or fertilizer burn |
| Brown is confined to lower, older leaves | Leaf scorch from direct sun |
| Tiny brown specks are scattered across the surface | Natural aging or overwatering |
| Brown spots with a yellow halo or ring | Fungal or bacterial infection |
| Tiny brown specks scattered across the surface | Spider mites or thrips |
| Brown, wilted, and dropping suddenly | Severe underwatering or cold damage |
Use this table as your entry point. The sections below provide a full explanation of each cause, what it looks like in practice, why it happens biologically, and how to correct it.
1. Overwatering — The Most Common Cause
Overwatering is responsible for more brown leaves on Peperomia Obtusifolia than any other factor. Understanding why requires understanding the plant’s biology.
Peperomia Obtusifolia is a semi-succulent. Its thick leaves and stems are designed to store water as a buffer against drought — an adaptation from its native habitat in the understory of Central and South American tropical forests, where rainfall is seasonal and inconsistent. In a home environment, this reservoir means the plant can go much longer between waterings than most people expect.
When the soil stays consistently wet, two things happen simultaneously. First, the roots are starved of oxygen — roots need air as much as water, and waterlogged soil suffocates them. Second, the wet conditions create an ideal environment for the anaerobic bacteria and fungi that cause root rot. Once the roots are compromised, they can no longer transport water and nutrients upward through the plant, and the leaves begin to show the consequences.
What Overwatering Looks Like
- Leaves that are soft, yellowing, and turning brown in a mushy, wet-feeling way
- Browning that starts at the center or base of the leaf rather than the edges
- Soil that remains wet for more than 7–10 days after watering
- A sour, stale, or musty smell rising from the potting mix
- Leaves that detach easily or fall off when lightly touched
- Lower leaves are affected first, with the problem spreading upward
How to Correct Overwatering
Stop watering immediately. Allow the soil to dry out completely before the next watering session. “Completely” means dry several inches down, not just at the surface.
Evaluate your drainage setup. A pot without drainage holes is the single most common structural cause of overwatering — there is nowhere for excess water to escape, so it pools around the roots indefinitely. If your pot lacks drainage, repot into one that has it. If water collects in a saucer beneath the pot, empty it within an hour of watering; never allow the plant to sit in standing water.
Learn to read soil moisture directly. Push your finger two inches into the soil. If you feel any moisture at all, wait. Only water when it is completely dry at that depth. Alternatively, lift the pot — a dry pot will feel noticeably lighter than a freshly watered one. With practice, this weight-based method becomes second nature.
Adjust your schedule by season. During spring and summer (active growth), watering every 7–14 days is typical for most indoor conditions. During fall and winter, when growth slows and evaporation rates drop, stretching to once every 3–4 weeks is appropriate. These are guides, not rules — always confirm with the soil test rather than relying solely on a calendar.
2. Underwatering and Drought Stress
Although less common than overwatering, drought stress is a real problem — particularly in warm homes, during summer, or when a plant has been neglected for an extended period. The browning pattern from underwatering is distinctly different from overwatering, which makes it straightforward to diagnose once you know what to look for.
What Underwatering Looks Like
- Brown tips and edges that are dry, crispy, and papery — never soft or mushy
- Leaves that curl inward slightly or appear faintly wrinkled, as though slightly deflated
- Soil that is bone dry and pulling away from the sides of the pot
- A very lightweight pot
- Slow or stalled growth despite otherwise adequate conditions
How to Correct Underwatering
Water thoroughly. When you water, water until it flows freely from the drainage holes. A shallow watering that wets only the top inch of soil does little good — the goal is to saturate the entire root zone.
Rehydrate severely dry soil from the bottom. When soil dries out completely, it can become hydrophobic — water poured on the surface will run straight down the sides of the pot and out the drainage holes without actually penetrating the dry core. If you notice this happening, place the entire pot in a basin or bucket of water and allow it to soak for 20–30 minutes. The soil will draw water upward through capillary action, rehydrating evenly throughout.
Re-establish a consistent routine. Peperomia Obtusifolia handles the occasional drought reasonably well thanks to its leaf reserves, but repeated, severe drying cycles cause cumulative stress. Aim for consistency rather than perfection.
3. Root Rot
Root rot deserves its own section because it is both a consequence of overwatering and a separate, escalating condition that requires specific intervention. Many growers correct their watering schedule, but continue to see browning because the root rot that has already developed is still active underground.
Root rot is caused primarily by water molds in the genus Pythium and Phytophthora, as well as soil-dwelling fungi such as Fusarium and Rhizoctonia. These pathogens thrive in wet, anaerobic soil conditions. Once established, they spread through the root system rapidly, breaking down root tissue until the plant can no longer absorb water or nutrients.
The cruel irony of root rot is that its symptoms — wilting, drooping, and browning leaves — look exactly like underwatering. A grower who doesn’t check the roots may water more in response, which makes the rot worse.
What Root Rot Looks Like
- Persistent soft, brown, mushy leaves despite reducing water
- Soil with a foul, sour, or rotting smell
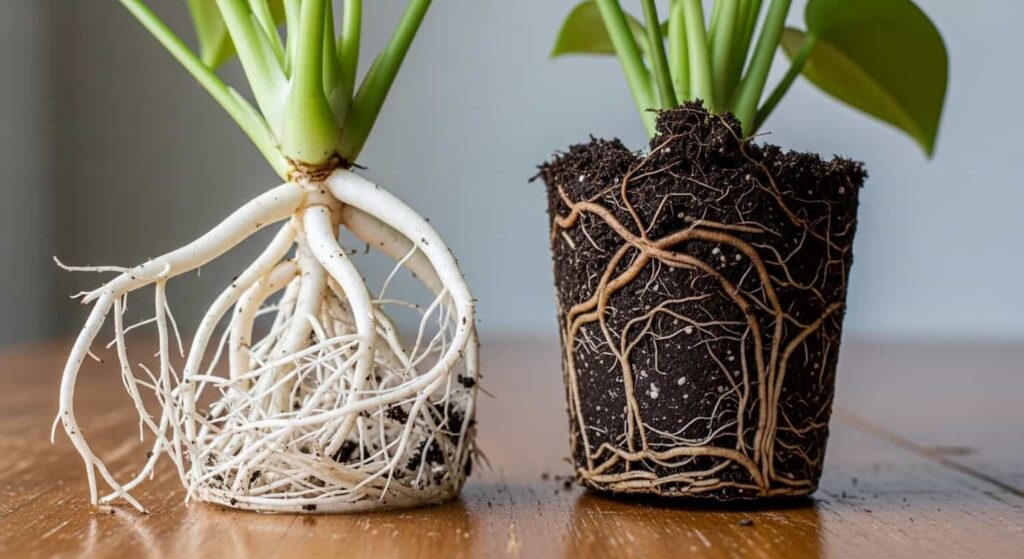
- Roots that are dark brown to black, soft, slimy, and may fall apart when touched (healthy roots are white to light tan and firm)
- Wilting that does not improve after watering
- A plant that looks generally worse each week despite care
How to Treat Root Rot
Remove the plant from its pot. Gently shake and rinse away all old soil from the root system. Old, infected soil can reintroduce pathogens if reused.
Assess the damage. Hold the roots under room-temperature running water and examine each one. Firm and white means healthy. Dark, soft, and slimy means rotted. If more than half the root system is affected, recovery is still possible but will be slower.
Prune all rotted roots. Use scissors or pruning shears that have been sterilized with rubbing alcohol or a diluted bleach solution. Cut back to healthy tissue — you want clean, firm, white cuts. Remove any leaves that are severely damaged as well, since the compromised root system will struggle to support the full canopy.
Treat the remaining roots. Allow the roots to air-dry for 30–60 minutes. Dusting the cut ends with powdered cinnamon provides mild antifungal protection. Alternatively, soaking the roots briefly in a diluted hydrogen peroxide solution (one part 3% H₂O₂ to four parts water) can help kill surface pathogens.
Repot into a fresh, sterile mix. Use a new pot, or thoroughly clean and sterilize the old one with a bleach solution. Choose a pot only slightly larger than the trimmed root system — a pot that is too large holds excess soil that stays wet and creates conditions for rot to return.
Hold off on watering. Wait 5–7 days before watering after repotting. This allows any cut root ends to callous over and heal before being exposed to moisture again.
4. Low Humidity and Dry Air
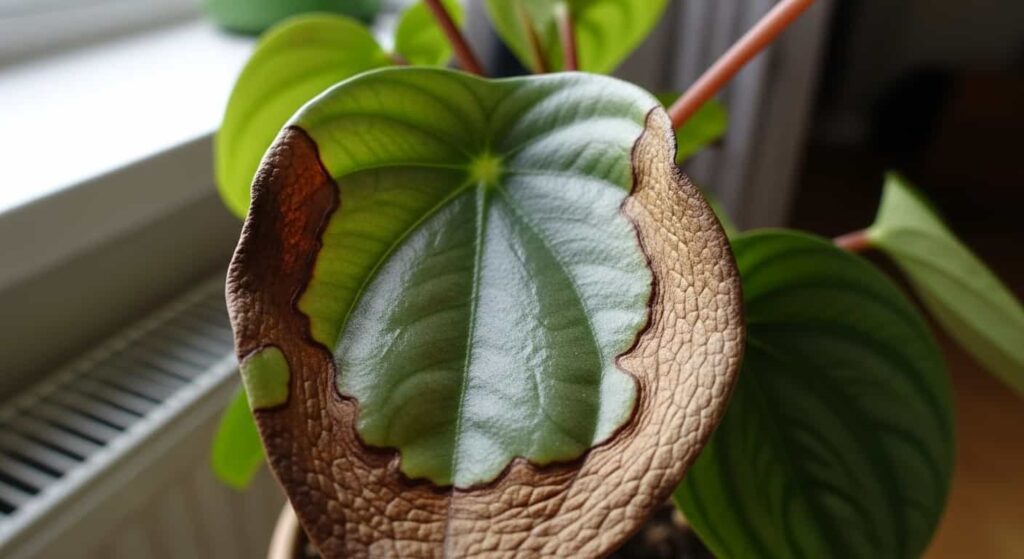
Peperomia Obtusifolia is native to humid tropical and subtropical regions. In the wild, it grows in environments where humidity typically ranges between 60–80%. While it adapts to drier indoor conditions better than many tropicals, sustained low humidity — particularly below 30–35% — will cause the leaf edges and tips to lose moisture faster than the plant can replenish it.
This problem is most acute in winter, when central heating significantly dries indoor air. Air conditioning in summer can have the same effect. Plants positioned near vents, radiators, or fans are at greatest risk.
What Humidity Stress Looks Like
- Brown, crispy tips and margins — typically symmetrical on both sides of the leaf
- Leaves that appear slightly less plump or glossy than usual
- The problem worsens in winter or worsens following changes in heating use
- Tips and edges are dry, never soft or mushy
How to Increase Humidity
Relocate the plant away from heat sources. This is the most immediately impactful step. A plant sitting 6 inches from a heating vent will experience dramatically lower effective humidity than one across the room.
Group plants together. Plants release moisture through their leaves via transpiration. A cluster of several plants creates a microclimate with measurably higher humidity than any single plant in isolation.
Use a pebble tray. Fill a shallow tray or saucer with pebbles or gravel, add water to just below the top of the pebbles, and set the pot on top. The pot must not sit in the water itself — this would recreate overwatering conditions at the roots. As the water in the tray evaporates, it raises humidity directly around the plant.
Use a humidifier. For homes with persistently dry air, a small humidifier positioned near your plants is the most reliable and consistent solution. A target of 40–60% relative humidity is ideal for most tropical houseplants.
Avoid misting. Misting is widely recommended but is largely ineffective at raising ambient humidity — the water evaporates within minutes. Worse, misting wet foliage in stagnant indoor air creates ideal conditions for fungal infections, which can cause their own browning problems.
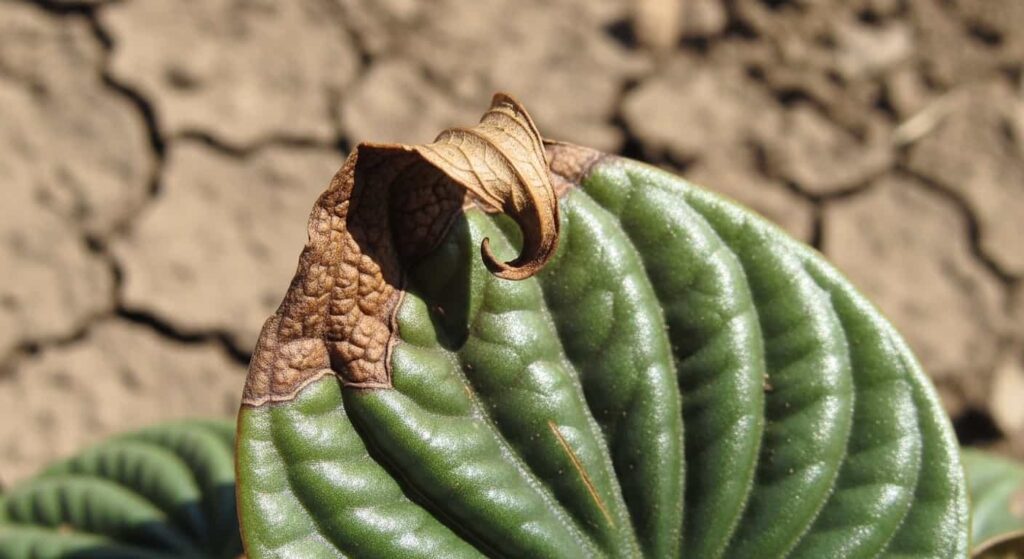
5. Direct Sunlight and Leaf Scorch
Despite being marketed as a “low light” plant, Peperomia Obtusifolia actually performs best in bright, indirect light. What it cannot tolerate is direct, unfiltered sunlight — particularly the intense afternoon sun of a south- or west-facing window during summer months.
Direct sun causes the chlorophyll-containing cells in the leaf surface to overheat and break down. The result is irreversible cell damage — what appears visually as bleaching or scorching.
What Sunburn Looks Like
- Dry, papery brown or tan patches appearing on the upper surface of leaves
- The affected areas often look bleached, faded, or washed out relative to the surrounding leaf
- The pattern is typically irregular rather than following the leaf margin
- Damage is most severe on leaves closest to the window or most directly exposed to the sun
- The problem develops or worsens during the summer when sun angles are higher
How to Address Sunburn
Move the plant away from direct sun. Shift it back from the window by at least 2–3 feet, or move it to a window with a different orientation. East-facing windows provide gentle morning sun that is rarely intense enough to cause scorch.
Filter harsh light with a sheer curtain. A thin curtain diffuses direct sunlight into bright, indirect light — exactly what Peperomia Obtusifolia thrives in — without reducing the overall brightness too dramatically.
Rotate the plant regularly. Rotating a quarter turn every 2–3 weeks ensures all sides of the plant receive even light exposure and prevents one side from becoming overexposed.
Remove scorched leaves. Burned tissue will not recover or green up. Removing damaged leaves directs the plant’s energy toward new, healthy growth.
6. Insufficient Light
The opposite problem — too little light — is also capable of producing brown leaves, though through a different mechanism. When light is insufficient, the plant cannot photosynthesize at a rate that supports its existing leaf mass. Older, lower leaves — which are farthest from the light source and least efficient — are shed first as the plant consolidates resources.
What Low Light Stress Looks Like
- Yellowing and browning that begins on the lowest, oldest leaves and moves upward over time
- Slow or completely stalled growth over many months
- Stems growing unusually long and spindly, leaning strongly toward the nearest light source (etiolation)
- Variegated varieties losing their color contrast — the cream or lighter portions fade as the plant produces more chlorophyll in an attempt to maximize light capture
How to Improve Lighting Conditions
Identify a better location. An east-facing window — providing gentle, direct morning light for a few hours followed by bright indirect light the rest of the day — is close to ideal. A north-facing window in most climates will be insufficient. South and west windows work well if the plant is positioned away from the glass or the light is filtered.
Supplement with artificial light. Full-spectrum LED grow lights have become increasingly affordable and effective. Positioning one 12–18 inches above the plant for 12–14 hours per day can fully compensate for inadequate natural light. This is particularly useful in winter or in rooms without south-facing windows.
7. Fertilizer Burn and Mineral Salt Buildup
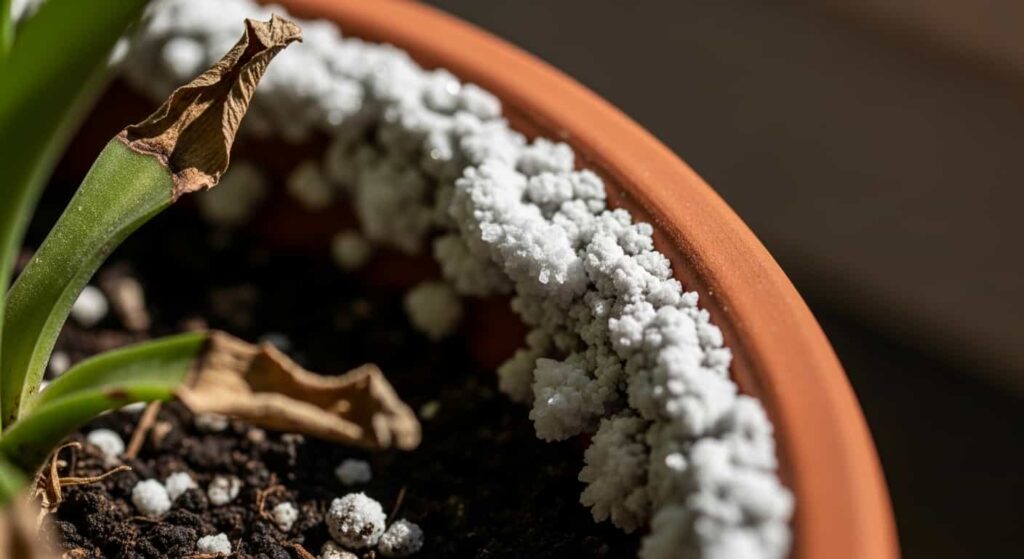
Peperomia Obtusifolia has relatively modest nutritional requirements. Because it grows slowly compared to many houseplants, it does not consume nutrients rapidly, and excess fertilizer accumulates in the soil as mineral salts rather than being absorbed by the plant.
Over time, these salt deposits raise the electrical conductivity of the soil solution. Through osmosis, water is drawn out of the root cells into the high-salt surrounding soil rather than flowing into the roots — the reverse of what should happen. This effectively dehydrates the plant from the inside out, even when the soil appears adequately moist. The result is brown leaf tips and edges that look very similar to drought stress or low humidity damage.
What Fertilizer Burn Looks Like
- Dry, crispy brown tips and edges — especially noticeable on newer, younger growth
- A white, crusty deposit visible on the soil surface or along the inside rim of the pot (dried mineral salts)
- Browning that began shortly after a fertilizing session
- The pattern typically affects the tips and margins uniformly around the plant
How to Correct Fertilizer Burn
Flush the soil thoroughly. Water the plant heavily several times in a row, allowing the water to drain completely between each pass. Running a large quantity of water through the soil dissolves and washes accumulated salts out through the drainage holes. This is called leaching.
Stop fertilizing for 6–8 weeks. Give the plant time to recover before reintroducing any nutrients.
Repot if salt buildup is extreme. If the white crust is present throughout the soil or the damage is severe, repotting into fresh potting mix is the most thorough solution.
Adopt a conservative fertilizing approach going forward. Peperomia Obtusifolia benefits from fertilization, but only during its active growing season (spring through early fall). A balanced, water-soluble fertilizer diluted to half the manufacturer’s recommended concentration, applied once a month, is sufficient. Do not fertilize in fall or winter, when the plant’s growth rate slows and its ability to absorb nutrients drops significantly.
8. Cold Temperatures and Drafts
Peperomia Obtusifolia is a tropical plant with no cold hardiness. It thrives in temperatures between 65°F and 80°F (18°C–27°C) and begins to suffer below 55°F (13°C). Exposure below 50°F (10°C) — even briefly — can cause cellular damage in the leaves.
Cold damage is often missed because it tends to happen intermittently and out of sight: a cold draft from a poorly sealed window on a winter night, a windowsill that drops in temperature when the sun goes down, or proximity to an air conditioner in summer. The plant may look fine during the day when temperatures are normal, but it only experiences the cold exposure at night.
What Cold Damage Looks Like
- Brown patches that appear water-soaked or translucent initially, then darken to black or dark brown.
- Sudden leaf drop — leaves falling off that weren’t visibly browning before
- Overall, wilting and collapse despite normal watering
- The problem appears or worsens after a cold night, a window being left open, or air conditioning use
How to Address Cold Damage
Relocate the plant. Move it away from cold windows, exterior walls, doors, and air conditioning vents. A spot in the interior of the room, away from any cold air source, is ideal.
Never place Peperomia on a cold windowsill in winter. Even if the room temperature is adequate, the glass radiates cold, and the temperature at the windowsill itself — especially at night — can drop significantly below room temperature.
Maintain consistent temperatures above 60°F (15°C). Cold snaps matter less than chronic cold exposure. Steady warmth, even at the lower end of the ideal range, is better than an average that masks cold extremes.
Trim damaged leaves. Cold-damaged tissue does not recover. Removing it prevents secondary infection and improves the plant’s appearance as it regenerates.
9. Pest Damage
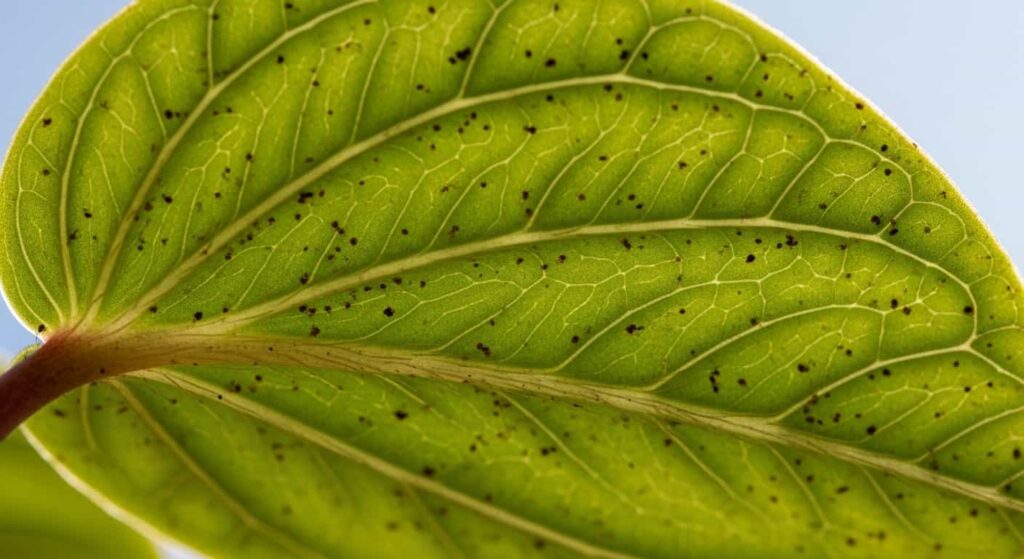
Several common houseplant pests target Peperomia Obtusifolia, each leaving a distinctive pattern of damage that can range from scattered brown specks to widespread leaf distortion and wilting.
Common Pests and Their Signatures
Spider Mites Spider mites are among the most common houseplant pests and thrive in warm, dry indoor air conditions that also stress the plant independently. They feed by piercing leaf cells and extracting the contents, leaving behind tiny white or yellow stippling (speckles) that gradually turn brown. Fine webbing on the undersides of leaves or in the angles where leaves meet stems is the diagnostic sign. A severe infestation can cause entire leaves to bronze and die.
Mealybugs are soft-bodied insects that gather in leaf axils, along stems, and on the underside of leaves. They excrete a sticky, sugar-rich waste called honeydew, which coats the leaves and fosters the growth of sooty mold — a black fungal film. Affected leaves yellow and brown around feeding sites. The insects themselves are visible as small, white, cottony or waxy masses.
Thrips rasp through the leaf surface and suck out the cell contents, leaving silver-grey or tan streaks and patches across the leaf. The damage has a characteristic scratched or scarred appearance. Thrips are fast-moving and slender — best spotted by tapping a leaf over a white sheet of paper and watching for movement.
Fungus Gnats Adult fungus gnats are mostly a nuisance — they don’t directly damage leaves. However, their larvae live in moist soil and feed on organic matter, including fine root hairs. In large populations, larval feeding can compromise the root system enough to cause browning symptoms similar to overwatering or root rot, since the damaged roots can no longer support the plant efficiently.
Scale Insects Scale appears as small, flat, oval bumps — typically brown or tan — attached firmly to stems and the undersides of leaves. They are easily mistaken for part of the plant. Like mealybugs, they produce honeydew and can cause yellowing and browning around feeding sites.
How to Treat Pests
Isolate the affected plant immediately. Many houseplant pests spread easily between plants through physical contact or by crawling along surfaces.
Physically remove as many pests as possible first. For mealybugs and scale, a cotton swab dipped in 70% isopropyl rubbing alcohol can dissolve the waxy coating and kill the insects on contact. Wiping down all leaf surfaces with a damp cloth removes dust and reduces mite populations.
Apply neem oil or insecticidal soap. Both are effective against soft-bodied insects, including mites, mealybugs, thrips, and aphids. Neem oil works partly by disrupting the pest’s hormonal system and partly as a suffocant. Insecticidal soap disrupts the pest’s cell membranes. Both must coat the insects directly to work — thorough coverage of all leaf surfaces, including undersides, is essential.
Repeat treatments every 5–7 days for at least 3–4 cycles. A single treatment kills active adults and nymphs but does not kill eggs. Repeating at regular intervals breaks the reproductive cycle by eliminating each new generation before it can reproduce.
For fungus gnats specifically, allow the soil to dry out more thoroughly between waterings — the larvae require moist soil to survive. Yellow sticky traps placed near the soil surface catch the flying adults and help monitor population levels.
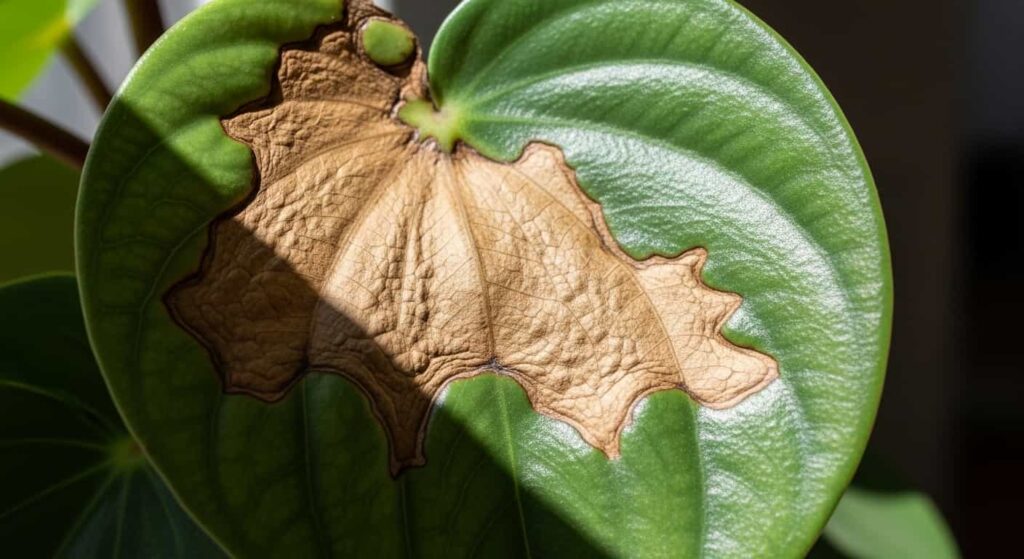
10. Fungal and Bacterial Disease

Unlike pest damage, which tends to produce stippling, streaking, or wilting, fungal and bacterial leaf diseases typically produce discrete spots with clearly defined borders, often surrounded by a yellow halo. They are most commonly triggered by a combination of high humidity, poor air circulation, and water sitting on the leaf surface.
Common fungal pathogens include Cercospora, Phyllosticta, and Rhizoctonia, while bacterial leaf spot is most commonly associated with Pseudomonas or Xanthomonas species.
What Fungal and Bacterial Diseases Look Like
- Distinct, round to irregular dark brown or black spots with a yellow ring (halo) around them — this yellow margin is a characteristic sign of an active infection spreading outward.
- Spots that enlarge and sometimes merge over time into larger dead zones
- Lower leaves affected first (where humidity is highest and air circulation is poorest)
- Problem appearing or worsening after periods of misting, high indoor humidity, or water splashing on the foliage
How to Treat Fungal and Bacterial Disease
Remove all visibly infected leaves immediately. Do not compost them — dispose of them in the trash to prevent spreading spores or bacteria. Sterilize your scissors between cuts with rubbing alcohol.
Improve air circulation. Moving the plant to a location with better airflow — away from corners and from behind other dense foliage — significantly slows the spread of both fungal and bacterial infections, which rely on moisture-saturated air to colonize new tissue.
Water at the base only. Avoid any practice that wets the foliage — wetting leaves creates surface moisture that fungal spores need to germinate and infect. Always pour water directly onto the soil, not over the plant.
Apply a copper-based fungicide or bactericide. Copper-based products are effective against a broad range of both fungal and bacterial pathogens and are among the safest options for indoor use. Systemic fungicides — those absorbed into the plant’s tissues — can be more effective for advanced infections. Follow product label instructions precisely.
Consider repotting if the infection is severe or if the potting soil itself appears contaminated, as some fungal pathogens persist in soil and can re-infect from the roots upward.
11. Tap Water Chemistry
This is a subtle, slow-developing cause of browning that often goes unrecognized because the damage accumulates gradually rather than appearing suddenly. Municipal tap water is treated with chlorine and chloramines for safety, and in many areas also contains dissolved fluoride and various mineral ions, including calcium, magnesium, and sodium. Peperomia Obtusifolia — like many tropical houseplants — is sensitive to fluoride in particular, which accumulates in leaf tip tissue over time and causes cell damage.
Sodium, from water softeners, is particularly harmful and should be avoided entirely for watering plants.
What Tap Water Sensitivity Looks Like
- Crispy, brown tips on leaves that are otherwise healthy and show no other signs of stress
- A fine white mineral crust forms on the soil surface or on the inner edge of the pot
- The problem develops slowly over months and improves if the water source is changed.
- Leaves closest to full size are affected first (fluoride accumulates as leaves mature)
How to Address Tap Water Issues
Allow tap water to sit out overnight in an open container before use. Chlorine is a volatile compound and will off-gas into the air within 24 hours. This does not, however, remove chloramines (which are more stable), fluoride, or dissolved mineral salts.
Use filtered, distilled, or rainwater. These options remove or greatly reduce the dissolved compounds that cause long-term buildup. Distilled water is the most thorough option. Collected rainwater is excellent and free. A basic charcoal water filter removes chlorine and chloramines, but not fluoride or hardness minerals; a reverse osmosis filter removes nearly everything.
Flush the soil periodically. Every 2–3 months, water the plant heavily several times in succession to wash accumulated minerals out through the drainage holes. This alone can significantly slow the buildup of damaging deposits.
Step-by-Step Recovery Protocol
If your plant has significant browning and you are not yet certain of the cause — or if multiple causes may be contributing — this structured recovery protocol addresses all of the most common issues systematically.
Week 1: Diagnose and Stabilize
- Remove all visibly brown, dead, or severely damaged leaves using clean scissors.
- Unpot the plant and examine the roots: are they white and firm, or dark and soft?
- Inspect all leaf surfaces, especially undersides and leaf axils, for signs of pests.
- Press your finger 2 inches into the soil and assess moisture: is it wet, damp, or bone dry?
- Move the plant to bright, indirect light in a location away from heating vents, cold windows, and drafts.
- If pests are found, isolate the plant immediately and begin treatment
Week 2: Address Structural Issues
- If roots showed signs of rot, repot into fresh, well-draining potting mix in a clean pot with drainage holes.
- If the soil is compacted and hydrophobic, repot or, at a minimum, flush and amend it
- If no root rot was found, but watering has been excessive, allow the soil to dry fully before the next watering.
Weeks 3–4: Optimize Conditions and Monitor
- Establish a watering routine based on soil testing rather than a fixed schedule.
- Evaluate and address humidity if tips are still browning
- If pest treatment was initiated, continue the repeat-application schedule
- Hold off on fertilizing until the plant shows signs of stable new growth
Ongoing Maintenance
- Check leaves weekly — catching problems early dramatically improves outcomes.
- Rotate the plant a quarter turn every 2–3 weeks for even light exposure
- Flush the soil with a heavy watering session every 2–3 months to clear mineral accumulation
- Reassess the care routine when seasons change, since light levels, temperature, and indoor humidity shift significantly between summer and winter
Preventive Care Reference
| Care Factor | Optimal Conditions |
|---|---|
| Light | Bright, indirect light; no unfiltered direct sun |
| Watering frequency | Every 7–14 days in spring/summer; every 3–4 weeks in fall/winter |
| Watering method | Always check soil depth before watering; water thoroughly until drainage occurs |
| Soil | Well-draining mix; adding perlite at a 1:1 ratio with standard potting mix improves drainage significantly |
| Humidity | 40–60% relative humidity |
| Temperature | 65–80°F (18–27°C); keep above 55°F (13°C) at all times |
| Fertilizer | Balanced, diluted to half-strength; monthly during spring and summer only |
| Pot type | Any material with functional drainage holes; terracotta is beneficial because it allows the root zone to breathe |
| Repotting | Every 2–3 years, or when roots are visibly circling the bottom of the pot |
Frequently Asked Questions
Should I cut off brown leaves?
Yes. Brown leaf tissue will not revert to green — the damage is permanent. Leaving dead or dying leaves on the plant serves no purpose and can create entry points for secondary fungal or bacterial infections. Use sterilized scissors and cut cleanly at the base of the leaf stem. If only the tip or edge is brown, you can trim back to green tissue rather than removing the entire leaf.
Why does my plant only have brown tips, and the rest of the leaf looks fine?
Isolated tip browning on otherwise healthy leaves almost always points to one of three things: low humidity, fluoride or mineral accumulation from tap water, or mild fertilizer burn. These causes all produce dry, crispy tip damage without affecting the broader leaf. Switching to filtered or distilled water, increasing ambient humidity, and flushing the soil are the most effective responses.
Can a severely browned Peperomia Obtusifolia recover?
In the majority of cases, yes — provided the stem is still firm and green and there is at least some healthy leaf tissue remaining. The plant can generate new growth from healthy stem nodes even after losing most of its leaves. The most important step is identifying and correcting the underlying cause before addressing anything else. Treating symptoms without addressing the cause will produce temporary improvement at best.
How do I tell root rot from underwatering when both cause wilting and browning?
The two conditions look almost identical from the outside, which is why root inspection is essential whenever you see wilting that doesn’t resolve logically. Unpot the plant and examine the roots directly. Underwatering leaves roots intact — they will be dry and possibly shrunken, but should still be firm and light-colored. Root rot produces roots that are dark (brown to black), soft, and often slimy, with a distinct foul smell.
Why are only the lower leaves browning?
Lower leaf browning, when it occurs gradually and involves only the oldest leaves, is often entirely natural. As the plant puts energy into new growth at the top, it sheds its oldest lower leaves — this is a normal part of the growth cycle and not a cause for concern if it is happening slowly and new leaves are appearing. However, if lower leaves are browning rapidly, in large numbers, or accompanied by soft texture and a musty smell, overwatering or root rot is the likely explanation.
Is Peperomia Obtusifolia difficult to care for?
It is not inherently difficult, but it does require understanding one counterintuitive principle: this plant needs far less water than most people instinctively give it. Its thick leaves are a signal that it has adapted to survive periods of drought. The majority of problems that affect this species — root rot, fungal disease, and general decline — trace back to overwatering. Master the watering schedule, and most other aspects of its care become straightforward.
Summary
Brown leaves on Peperomia Obtusifolia are never random — they are always the plant communicating that something in its environment is off. The key to resolving the problem is observing the specific character of the browning (soft vs. crispy, spotted vs. diffuse, tips vs. whole leaf, lower leaves vs. all leaves) and matching it to the cause.
The plant’s resilience is genuine. Given accurate diagnosis and appropriate corrections, Peperomia Obtusifolia recovers reliably from most of the conditions described in this guide — including root rot, pest infestations, and cold damage — as long as the intervention is made before too much of the plant’s structure is lost. Develop the habit of checking in with your plant weekly, reading the soil before every watering, and adjusting your care practices as the seasons change. Those three habits alone will prevent the majority of problems that cause browning in this species.