
How to Repot Peperomia Without Root Damage
Repotting a Peperomia obtusifolia without damaging its roots comes down to one structure most growers never think about: the root hair. These microscopic, single-cell extensions do almost all of the plant's water absorption, and they tear or desiccate within minutes of exposure to open air. The core protocol is pre-hydration 24 hours beforehand, a pot no more than one inch larger in diameter, and a low-stress recovery period afterward — together these keep transplant shock to a few days instead of several weeks.
Quick-Reference Protocol
| Stage | Timing | Action |
|---|---|---|
| Pre-hydration | 24 hours before | Water thoroughly so the plant enters the move at full turgor |
| Pot size | At repot | Increase diameter by exactly 1 inch (2.5 cm) |
| Substrate | At repot | Free-draining mix, at least 30% inorganic content |
| Root handling | At repot | Minimal disturbance; trim only dense circling mats |
| Settling-in water | Immediately after | Room-temperature water until it runs from the drainage hole |
| Light | First 3-5 days | Bright but indirect, not the plant's usual stronger spot |
| Fertiliser | 4-6 weeks | Withhold entirely |
| Next watering | After settling-in water | Wait until the top 2-3 cm of substrate dries |
The Anatomy of Transplant Shock
The thick, visible roots of a Peperomia provide structural anchoring, but they barely absorb water. That job belongs to root hairs — single-cell projections a fraction of a millimetre long that make direct contact with the substrate and draw in most of the plant's moisture. They are also extremely fragile: a few minutes of exposure to dry room air is enough to collapse and kill them.
When repotting damages a large share of the root hairs, the plant is left with a hydraulic gap. Transpiration through the leaves continues at roughly its normal rate, but the roots can no longer replace that lost water at the same rate. The leaves lose turgor and wilt — not because the plant lacks water in the new substrate, but because it has temporarily lost the fine structures needed to draw that water in. Full root-hair regeneration typically takes 1-2 weeks, which is why mild wilting for the first few days after a repot is normal and not a sign of a failed transplant.
When to Repot: Confirm the Trigger First
Repotting itself carries a cost, so it should be a response to a genuine signal rather than a routine. Roots emerging from the drainage holes, water running straight through the pot, growth stalling in the active season, or turgor recovery taking longer than 24 hours after watering are the signs that justify the disruption — covered in full, with a combined diagnostic table, in the signs it's time to repot guide. If none of those are present, the healthiest option is to leave the plant alone; a moderately root-bound P. obtusifolia is operating close to its natural state, not suffering.
If the plant's leaves show large, soft, dark patches rather than ordinary wilting, check the black spots diagnostic guide before repotting — that pattern points to root rot, which changes the procedure below (compromised roots need to be cut back to healthy tissue first, not simply moved to a bigger pot).
Step 1: Pre-Hydration, 24 Hours Before
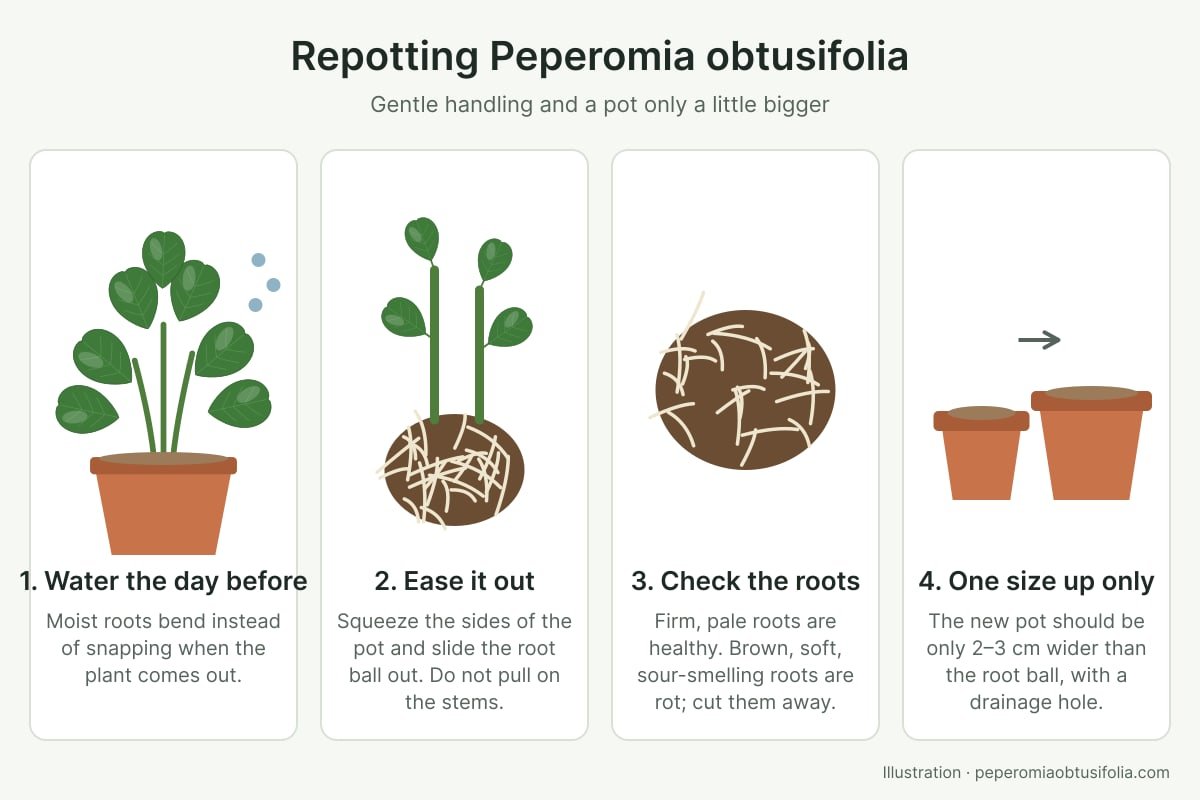
Water the plant thoroughly the day before the move so its cells are at full turgor. A well-hydrated plant carries more of an energy reserve into the disruption, and the moist substrate clings to the root ball as a light protective layer against air exposure during the transplant. Never repot a bone-dry plant — the roots are more brittle in that state and snap rather than bend when handled.
Step 2: Choose a High-Oxygen Medium and the Right Pot Size
Increase pot diameter by exactly one inch (2.5 cm) — a 10 cm pot moves to 13 cm, not 18 cm. A larger jump buries the existing root ball in a volume of substrate the diminished root-hair count cannot draw down for weeks, and that standing water produces the anaerobic conditions behind root anoxia.
Use a free-draining mix with at least 30% inorganic content (perlite, pumice, or fine bark) — the full 50/30/20 soil recipe is the site's standard. A more porous substrate compensates for the reduced water uptake capacity of a freshly repotted root system by draining excess moisture before it can sit against damaged tissue. Pot material matters too: unglazed terracotta wicks moisture faster and is the safer choice for a grower who tends to overwater during the recovery window, as covered in the best pots comparison.
Step 3: Unpot Gently and Minimise Root Disturbance
Squeeze the sides of a flexible pot to loosen the root ball rather than pulling on the stems. Do not attempt to remove all of the old soil or aggressively untangle circling roots — the fine feeder roots responsible for absorption sit near the surface of the root ball, and rough handling here does disproportionate damage relative to the amount of tissue disturbed. If roots are circling densely at the base, a conservative trim of the bottom 1-2 cm with sterilised shears is enough; leave the rest intact.
Step 4: Water In and Enter the Recovery Ward
Water immediately after repotting with room-temperature water (18-24°C) until it runs from the drainage hole, which collapses air pockets around the new roots and settles the substrate against them. For the following 3-5 days, keep the plant in bright but indirect light rather than its usual spot near stronger light — high light intensity drives transpiration and photosynthesis, both of which demand more from a root system that currently cannot deliver. Lowering that demand temporarily gives the plant room to prioritise root-hair regeneration.
Withhold fertiliser entirely for 4-6 weeks. Fertiliser salts concentrate around the damaged root tips and pull water out of them osmotically at exactly the point they are least able to tolerate it. Fresh substrate already carries enough nutrients to support the plant through this window.
Sanitise the Pot Before You Reuse It
If the new pot previously held another plant, sanitise it with a 1:10 bleach-to-water solution or hot soapy water before repotting into it. Pythium, the water mould most often responsible for root rot, can persist in the mineral deposits and residue on old pot walls for months. A freshly repotted plant — already carrying a reduced number of functioning root hairs — is more vulnerable to this kind of infection than an established one, since it has less absorptive capacity in reserve to compensate for early root loss.
Common Mistakes That Turn Shock Into Failure
Most repotting failures trace back to one of a handful of avoidable errors rather than anything unpredictable about the plant itself.
- Sizing up too aggressively. Jumping two or more pot sizes at once, rather than the one-inch increase, buries the root ball in substrate it cannot use, and that unused moisture sits in an anaerobic zone for weeks.
- Repotting a bone-dry plant. Dehydrated root tissue is brittle rather than pliable, so ordinary handling during unpotting causes far more tearing than it would on a well-hydrated plant.
- Fertilising within the first month. Root hairs regenerating after transplant are the most salt-sensitive tissue on the plant; a normal-strength feed at this stage can chemically burn tips that would otherwise have recovered within weeks.
- Using cold tap water for the settling-in watering. Water noticeably colder than room temperature adds a second, avoidable stressor — cold shock — on top of the mechanical disruption the roots are already recovering from.
- Repotting in winter without a genuine reason. Root regeneration depends on active growth, and most homes see growth slow sharply from November to February. A winter repot extends the vulnerable window rather than shortening it.
Recovery Timeline: What's Normal and What Isn't
Mild leaf softness or slight wilting for the first 3-5 days is the expected cost of root-hair damage, not a sign of a mistake. Turgor should visibly improve within 7-10 days as new root hairs form, with a full return to the pre-repot watering rhythm by 4-6 weeks. If wilting is severe from day one, or persists past 10-14 days without improvement, unpot and check for soft, brown, malodorous roots — that pattern indicates the plant went into the repot with rot already present, or that the new substrate is holding too much water for the reduced root function to handle.
Conclusion
Repotting is disruptive by nature — it damages the root hairs a Peperomia obtusifolia depends on for water uptake — but the disruption is predictable and manageable. Hydrate 24 hours in advance, hold to the one-inch pot increase, disturb the root ball as little as possible, and give the plant a low-light, fertiliser-free recovery window of 4-6 weeks. Followed together, that sequence turns what could be a multi-week setback into a few days of mild wilting before normal growth resumes.
Care FAQ
How often should I repot Peperomia obtusifolia?
Every 2-3 years, not annually. This species has a small, thready root mass relative to its foliage and tolerates being slightly root-bound — repotting more often compounds transplant shock rather than helping the plant. Wait for a genuine trigger, such as roots at the drainage holes combined with slowed growth, rather than repotting on a fixed schedule.
Why is my Peperomia wilting after repotting?
This is transplant shock caused by damage to root hairs — the microscopic, single-cell structures responsible for most water absorption. They tear easily during unpotting, and once damaged the plant keeps losing water through its leaves without an equivalent intake from the roots. Mild wilting for 3-5 days is normal; if it continues past 10-14 days, check the roots for rot rather than assuming it is ordinary shock.
Should I water immediately after repotting?
Yes. Water thoroughly right after repotting to collapse air pockets around the new roots and settle the substrate, using room-temperature water to avoid adding cold-shock stress on top of the transplant. After that first watering, hold off on the next one until the top 2-3 cm of substrate has dried.
Can I repot Peperomia obtusifolia in winter?
It is best avoided. Root regeneration depends on active metabolic growth, which slows sharply in winter in most homes. A plant repotted in winter sits in freshly watered substrate for longer with a reduced capacity to heal root damage. Repot in spring or early summer, when hormonal activity and light levels support fast root recovery.