Hydrogen Peroxide for Peperomia: 3 Critical Steps
Root rot from sustained overwatering is by far the most common reason Peperomia obtusifolia roots turn soft and dark, and appearance alone — mushy, discoloured roots — is not enough to skip confirming the cause before treating it. Check that the substrate is genuinely saturated and the roots smell sour before reaching for hydrogen peroxide; a diluted 1:4 solution of 3% H2O2 is a legitimate one-off emergency step, but trimming dead tissue and correcting the drainage and watering interval matter more than the peroxide itself.
Quick Diagnosis
| Symptom pattern | Likely cause | Confirming check | First action |
|---|---|---|---|
| Yellowing lower leaves, wilting despite moist substrate | Root rot from overwatering | Unpot; check for soft, dark, sour-smelling roots | Trim dead roots, treat, repot into fresh mix |
| Wilting with dry, light pot | Underwatering, not rot | Substrate dry through top several cm | Water thoroughly; do not use peroxide |
| Soft, collapsed stem base with rot smell | Stem rot extending from roots | Press the base gently; mushy = advanced rot | Take clean stem cuttings; peroxide will not save the crown |
| Small flies around the substrate, larvae in top layer | Fungus gnats, often alongside overwatering | Yellow sticky trap catches adults; larvae visible in wet top layer | Dry the top layer; treat as a separate pest issue |
What Root Rot Looks Like
Root rot in this species presents first as lower-leaf yellowing that progresses upward, alongside wilting even though the substrate tests moist or wet — the plant is not short of water, it has lost the ability to take up the water that is present. Unpotted, affected roots are soft, dark brown to black, and the outer root cortex often slides off the inner core when lightly pulled, sometimes accompanied by a sour, anaerobic smell. This is distinct from simple drought wilting, where the pot feels light and the substrate is dry through the top several centimetres, and from cold-damage blistering, which appears on the leaves themselves rather than the roots. If the stem base is already soft and collapsing, the rot has progressed past what root treatment alone can reverse.
Causes Ranked From Most to Least Likely
1. Watering on a fixed schedule rather than checking dryness
This is the dominant cause. Substrate that stays wet for long periods loses its air-filled pores, and roots suffocate before Pythium or Phytophthora colonise the already-weakened, anoxic tissue. Confirm it: check whether watering has followed a calendar rather than the top-2-3cm-dry trigger — if so, this is almost certainly the primary cause.
2. A pot significantly larger than the root ball
Substrate outside the root zone has no biological mechanism drawing it down, so it stays wet far longer than the root system can tolerate even with otherwise correct watering habits. Confirm it: compare root-ball size to pot volume; a root ball filling less than half the pot is a red flag.
3. A dense, poorly aerated mix or blocked drainage
Peat-heavy or compacted substrate, or a pot without a functioning drainage hole, keeps the root zone saturated regardless of how carefully watering is timed. Confirm it: check the mix for less than roughly 30% perlite or bark by volume, and confirm water actually exits the drainage hole during watering.
4. Reused, contaminated substrate
Potting a new or recovering plant into old mix from a previously rotted specimen can reintroduce the same pathogen load. Confirm it: relevant only if the current mix was reused from an earlier plant that had confirmed root rot.
Step-by-Step Recovery Plan
Step 1 — Confirm the diagnosis before treating anything. Unpot and check root colour, texture, and smell against the table above. If the crown or lower stem is already mushy into the tissue above the soil line, hydrogen peroxide will not rebuild rotted vascular tissue — take clean stem cuttings above the damage instead.
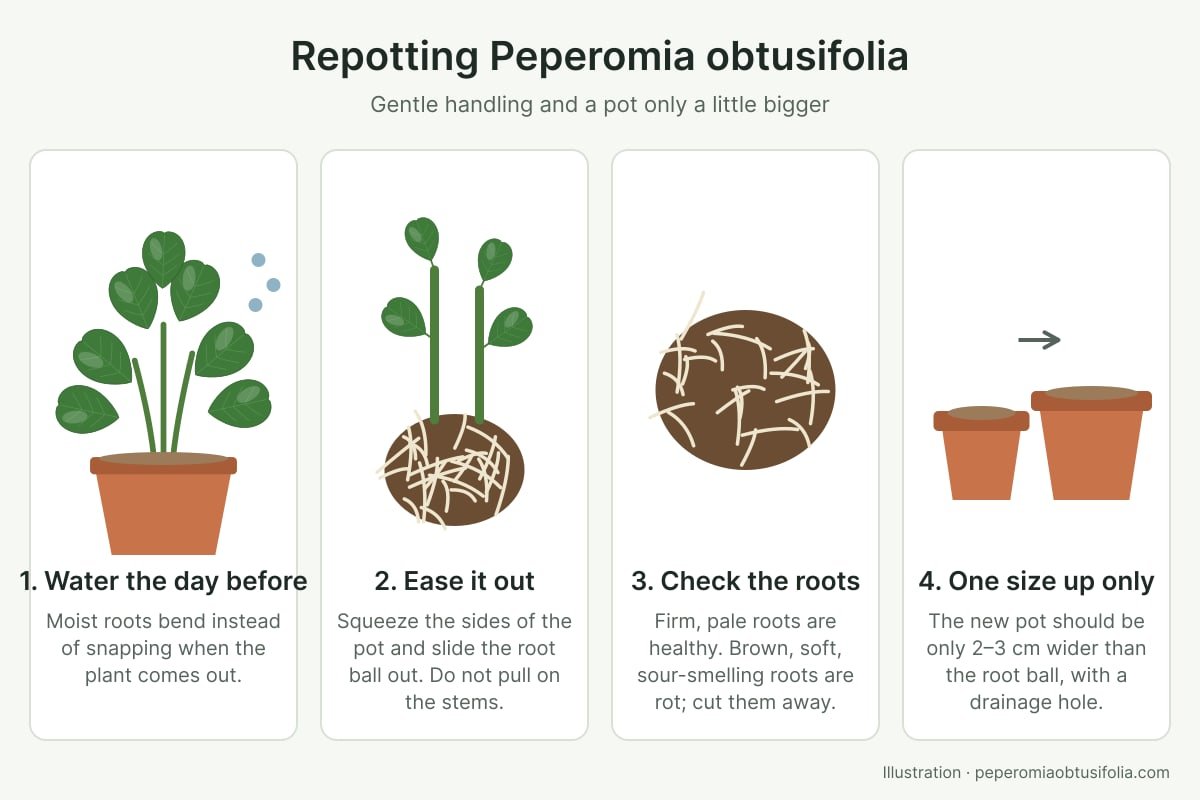
Step 2 — Trim, then treat. Rinse old substrate from the roots. Cut away all soft, dark, or odorous root tissue back to firm white or cream root, using sterile scissors between cuts. Mix one part 3% pharmacy-grade hydrogen peroxide with four parts water (roughly 0.6% final concentration — never use undiluted 3% directly on roots), and either soak the trimmed roots for 5-10 minutes or drench the empty pot once as a final rinse. Discard the old substrate entirely rather than reusing it.
Step 3 — Repot into fresh, aerated mix and resume dry-down watering. Use a free-draining substrate of roughly 50% peat-free compost, 30% perlite, and 20% bark — see the soil mix recipe guide for the full ratio — in a pot with a functioning drainage hole. One light water-in is enough; after that, wait until the top 2-3 cm of substrate is dry before watering again, exactly as the complete care guide specifies for normal conditions.
What not to do: don't repeat the peroxide treatment as a routine "preventive" drench — it strips beneficial rhizosphere microbes without addressing the actual cause, and repeated use provides no additional benefit over a single emergency application. Don't assume fizzing on contact means the plant is saved; it confirms the chemical reaction, not tissue survival.
Recovery Signs and Realistic Timeline
New root growth is not visible without unpotting, so the reliable above-soil signs are firmer, non-wilting leaves and a halt in further yellowing within the first couple of weeks after treatment. Existing yellowed leaves will not turn green again and can be removed once clearly no longer functional. A plant that continues declining after clean roots, fresh substrate, and corrected watering usually lost too much root or crown tissue before treatment began — at that point, propagating from any remaining healthy stem tissue is a more productive use of effort than continuing to treat the original root system.
How to Prevent Recurrence
Water strictly on the top-2-3cm-dry trigger rather than a fixed schedule, and confirm the pot is sized only 2-3 cm larger in diameter than the root ball rather than "roomy" for future growth. Keep the substrate's inorganic fraction (perlite, pumice, or bark) at 30% or more by volume, and use a pot with a functioning drainage hole. Growers who want to remove substrate-moisture judgement from the equation entirely sometimes move to semi-hydroponic LECA, which replaces the dry-down cycle with continuous reservoir wicking — a different system rather than a shortcut, but one that sidesteps this specific failure mode. Once a rescued plant has stabilised and resumed normal growth, cosmetic decisions like pruning back damaged growth for a fuller shape or reconsidering display placement become relevant again.
What Hydrogen Peroxide Does Not Fix
Hydrogen peroxide does not reverse stem rot that has already progressed into the crown — that requires taking clean cuttings, not a stronger soak; see why cuttings rot, and how to rescue one. It is not a fungus-gnat eradication strategy on its own — a single drench kills larvae on contact, but full eradication needs a complete life-cycle treatment plus a consistently dry top layer; see the dedicated fungus gnat guide. And it does not replace the drainage and watering correction that prevents recurrence — treating the rot without changing the habit that caused it means the same failure repeats in the next pot.
Sources
Root and stem rot from persistently wet soil: NC State Extension. Phytophthora rot and cutting rot (Phytophthora, Rhizoctonia, Pythium) on Peperomia: University of Illinois RPD 653. Phytophthora root rot in general: RHS. Species profile: Missouri Botanical Garden.
Care FAQ
Is hydrogen peroxide safe for Peperomia obtusifolia roots?
Diluted to 1 part pharmacy 3% hydrogen peroxide to 4 parts water (roughly 0.6% final concentration), a single soil drench or brief root soak is generally tolerated. Undiluted 3% burns root hairs on contact. H2O2 is non-selective, meaning it also damages beneficial soil microbes, so it is reserved for a one-off emergency rescue rather than routine watering.
What dilution of hydrogen peroxide should I use for Peperomia root rot?
Use 1:4 — one part 3% H2O2 to four parts water. This is the standard in-pot drench strength and the appropriate brief soak for trimmed roots. Stronger mixes such as 1:2 raise the risk of burning this species' fine, fibrous roots without providing additional benefit.
How often can hydrogen peroxide be used on a Peperomia?
Once, for an emergency rescue, then return to plain water on the normal dry-down schedule (top 2-3 cm dry before rewatering). Repeating the treatment as a "preventive" weekly drench strips the rhizosphere of beneficial microbes without addressing the drainage, substrate, or watering habit that caused the rot in the first place.
Does fizzing when hydrogen peroxide contacts the roots mean it is working?
Fizzing shows the peroxide decomposing on contact with organic matter and releasing oxygen — it confirms the chemistry is reacting, not that every pathogen has been eliminated or that already-dead roots have recovered. Brown, mushy root tissue still needs to be physically trimmed away regardless of how much the solution fizzes.